
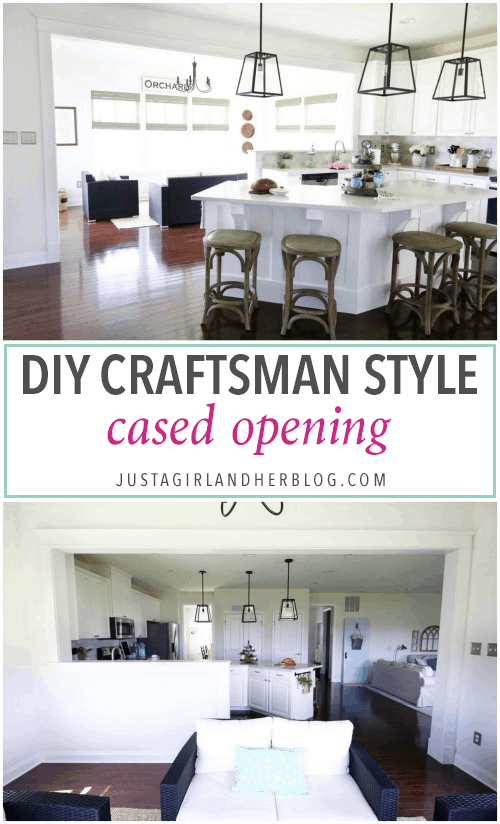
Hey there, pals!! I’m excited to be again right this moment with the ultimate installment of our kitchen DIY tasks sequence! A couple of weeks in the past I shared our kitchen reveal, and since then, I’ve been going again and having a look at all the tasks we did to improve our kitchen and get it trying precisely the way in which we needed it!
As a reminder, here’s what our kitchen regarded like on the day we moved in:

It actually wasn’t dangerous, however we had some modifications in thoughts! One in all these modifications was so as to add some lovely chunky trim work across the opening between the kitchen and the sunroom. The home was a terrific clean slate, but it surely undoubtedly lacked a few of that nice character you discover in older houses; we knew that including craftsman fashion trim to the opening could be a terrific step towards bringing in a number of the character that we had been in search of.
Donnie was the mastermind behind this kitchen challenge, so I’ll let him clarify the transformation. Right here he’s…
DIY Craftsman Type Cased Opening
Provides
Earlier than I leap into the how-to, listed here are the instruments and supplies I used for this challenge:
This publish incorporates affiliate hyperlinks. For extra info, see our disclosures right here.
Course of
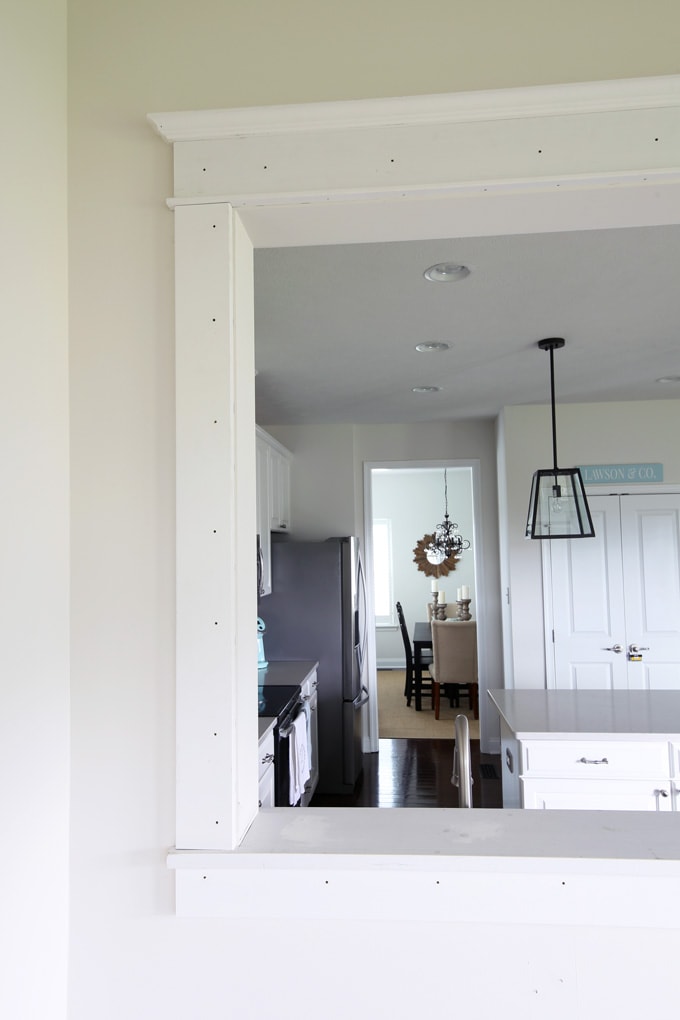
One of many first issues we had to consider after we determined so as to add trim work to the opening within the kitchen was what to do with the half wall above the sink that divides the kitchen from the sunroom. The counter tops that got here with the home had been additionally used as the highest floor of the half wall above the sink.

I suppose the thought is that you could possibly pull up bar stools from behind the sink and use it as an consuming floor. That appeared bizarre to Abby and I. Plus, the countertop on the half wall caught out actually far into the sunroom, and it was at all times in the way in which after we had been navigating round our sunroom furnishings.
Once we changed the laminate counter tops with quartz, I had the installers merely take away the previous countertop from the half wall. I knew that finally I would want to interchange it with wooden trim.

When you look intently on the above picture that was taken after we had our new counter tops put in, you’ll be able to see that the highest of the half wall behind the sink is ripped up.
For the substitute high of the half wall, I needed an enormous chunky piece of wooden. I used a 5/4 x 8 piece of pine from WindsorOne and needed to notch one finish in order that it may slide across the wall and supply a touchdown spot for the vertical items of trim. I used GRK end screws and building adhesive to safe the highest. It was actually essential to ensure every part was stage. I needed to loosen and tighten completely different screws till the board was utterly stage. As soon as the adhesive dried, our trim piece wasn’t going wherever!

Probably the most tough a part of trimming out this half-wall and big opening got here subsequent. After eradicating the baseboards on the base of the openings on both facet, I noticed that the hardwood flooring didn’t prolong proper as much as the wall; there was a niche that the baseboards had beforehand coated. To cowl the hole, I really needed to case the within of the opening. No customary trim measurement labored, so I needed to to purchase some 1×8 flat inventory and rip them all the way down to the proper width.

After the within of the openings had been cased, I put in WindsorOne plinth blocks. I wasn’t certain if we must always use these, however I’m actually glad we did. They supply one thing substantial for the vertical trim to take a seat on and the baseboards to run into.

As soon as the plinth blocks had been put in, I did the facet and high trim of the opening precisely as we did for the craftsman fashion window trim we simply completed. We needed to maintain a uniform look.

After all with this challenge, the main points had been just a little harder, equivalent to making notches for counter tops…

… and utilizing a jigsaw to attempt to match the contour of the cupboard trim on the header cap.


You’ll be able to see from the image that I didn’t do a terrific job, and I nonetheless had at the least an 1/8″ hole all the way in which round. Happily that is up excessive, so we crammed the hole with spackling, and from floor stage it’s arduous to see any imperfections.

A tip for the sort of trim work: nail weapons are useful however not vital. For this job I barely touched my nail-gun however as an alternative used GRK trim head screws, which are superb. Their holding energy is manner higher than 18ga brads from a nail-gun, and the small trim heads make patching and filling fairly simple.
From a private perspective, the sort of trim work may be very enjoyable and satisfying. It makes such a direct affect and there’s quite a lot of considering and measuring, however none of the particular work is strenuous in any respect. Probably the most irritating half is that when all of the trim is put in you’re solely half manner achieved. Patching nail holes, caulking, sanding, and portray at all times take manner longer than I feel it is going to. That a part of the method is far much less satisfying…
…till it’s completed and looking out lovely, that’s! I did quite a lot of the spackling and Donnie dealt with the caulking. We spent quite a lot of time sanding every part clean and painted all the trim with Behr Marquee Cameo White in a satin end. Here’s a have a look at the completed product on the kitchen facet:

And the sunroom facet:

It might solely be element work, however I really feel prefer it makes such an enormous distinction within the total character and attraction of the home! Here’s a have a look at the earlier than and after:

I’m excited to sort out much more trim work tasks in our home as we hold including our private touches to every room!
What are your favourite methods so as to add character in your house? I’d love to listen to your ideas within the feedback!
Have a beautiful day!
This publish incorporates affiliate hyperlinks. For extra info, see our disclosures right here.
