
IKEA hack! We created a DIY leisure system utilizing the IKEA’s BESTA Planner for a customized look that may be accomplished in a weekend!

Once we first moved into our new home, filling up the lounge felt like a frightening (but tremendous thrilling!) process as a result of it was a giant, white, open house:

our lounge on the day we moved in
We introduced in our furnishings, which helped a bit, however we knew we wanted one thing important on the TV wall, each for storage functions and so as to add some visible curiosity. That little aspect desk simply wasn’t going to chop it!

We knew we wanted one thing pretty substantial to take up house on that wall, however in fact we needed it to look lovely as effectively. Whereas I used to be visiting our native IKEA, I occurred to seek out the right answer.
Easy methods to Create an Leisure Unit with the IKEA BESTA System Step-by-Step
This put up comprises affiliate hyperlinks. For extra data, see my disclosures right here.
We finally determined to go along with the IKEA BESTA system and make some modifications to present it a extra customized built-in look. (As a result of actually, who doesn’t love a very good IKEA hack?!)
1. Use the IKEA BESTA planner.
Our first step was to use IKEA’s BESTA Storage Planner to recreate the size of our lounge and design a 3D mockup of our customized built-ins. We went by way of a number of variations, looking for an association that match our imaginative and prescient of what the house would appear like AND creating some cupboard space, which was significantly missing in our earlier lounge setup.
Listed here are a number of the variations we didn’t select:
After enjoying round with the totally different choices and designs for manner longer than we in all probability ought to have, we lastly settled on this setup:
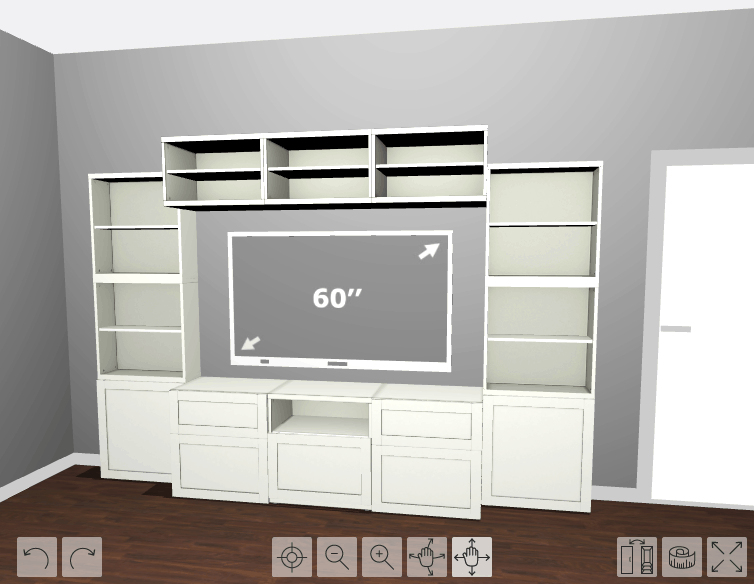
This model gave us the storage we needed, labored effectively in our house, and positively offered visible curiosity for that massive, clean wall!
2. Select the BESTA items in your DIY leisure unit.
IKEA BESTA items we ended up utilizing:
You possibly can see IKEA’s present door choices right here; we used the HANVIKEN door fronts. Listed here are the measurements of the doorways/drawer fronts we used:
- 2- 23 5/8″ x 25 1/4″ Doorways
- 3- 23 5/8″ x 15″ Door/Drawer Fronts
- 2- 23 5/8″ x 10 1/4″ Drawer Fronts
We beloved the unit as-is, however we knew we needed to present it a extra customized, built-in look. Our plan to realize this included:
- Including crown moulding to all three high sections
- Elevating the unit off the bottom so we may have baseboards operating from the wall across the sides and entrance of the cabinets
- Including wood trim items to fill any seen gaps
- Including drawer pulls and {hardware}
As a result of we began this challenge within the midst of the Christmas season, we labored on it just a little bit at time over the interval of some weeks. From begin to end, although, this might all be accomplished in a single weekend, together with the additional trim work.
Instruments and Supplies
Along with the BESTA items, we additionally used the next supplies and instruments to finish the ultimate built-in unit:
Since Donnie was the mastermind behind really assembling and constructing all the pieces, I’m going to let him take it from right here…
3. Assemble the BESTA built-ins.
I began by assembling the BESTA flat-packed cupboard frames. This felt like a small job after assembling all the IKEA cupboards throughout our townhouse kitchen reno!
Constructing a Base for the Decrease Cupboards
As soon as I had put the cupboards collectively, I added some plywood to the underside of the bottom cupboards to lift all the pieces up above the baseboard stage in our residing room. This was so we may finally tie in our current baseboards to the baseboards that will go across the backside of the leisure unit.
All the plywood items I added sit flush with the cupboard from besides within the again. I needed to depart room so the cabinets would sit towards the wall and never stumble upon the baseboard.

My desk noticed was packed away, so I had the man on the residence enchancment retailer rip down a sheet of three/4″ plywood into the little “strips” of plywood I would wish to assemble the cupboard bases.
As soon as I had all of my plywood items, I used my little Kreg Jig to create some pocket gap joints. To make the joints as robust as doable, I used to be positive to drill my pocket holes in order that I wasn’t screwing into the tip grain of the wooden. I all the time glue the joints as effectively.

After I added the bases for all three flooring shelf models, I additionally measured the places of our retailers, cable hookups, and all the HDMI and community cables coming down from the TV, and used an oscillating multi instrument to create cutouts at the back of the unit to accommodate the cords.

We had been then prepared to slip the models into place. The recessed base body sat properly over the prevailing baseboards.

For every week or so, the bottom cupboards sat alone below the TV. Although I knew we nonetheless had plenty of work to do, it already appeared like a giant enchancment!

Attaching the Facet Cupboard Items
The following step was so as to add the cupboards on both aspect of the TV. The BESTA system is modular, so with every shelf, IKEA contains little brackets to affix cabinets collectively.

It was simple to set the cabinets on high of one another and click on the little steel brackets into place. The brackets helped to be sure that all the pieces was lined up correctly.

After clicking the cabinets into place, we may rock the highest shelf backward and insert little double sided sticky foam pads to maintain the highest shelf from sliding round.

4. Anchor the IKEA BESTA shelving to the wall.
Subsequent, it was time to anchor the cabinets into the wall. Much like once we had been putting in our townhouse’s kitchen cupboards, IKEA offers a rail system on which to anchor the cabinets. I like this as a result of I’ve all the time discovered that with out a rail system, it’s exhausting to get cabinets completely stage and precisely the place you need them. It’s simply too exhausting to maneuver one thing that massive and heavy up on a wall.
The rail system makes it simple to verify I put in the rail completely stage and precisely the place I needed it to be. I used one rail on every of the aspect high cabinets, and I made positive to tie every rail into at the very least one stud in order that it was good and durable.

After the rail was put in and leveled, I used to be in a position to cling my shelf straight on the rail, line up the anchor factors with the holes within the entrance of the cupboard, and fasten it with the offered screws.

The deeper cupboards above the TV had been up subsequent. I related three rails collectively for the highest three cupboards and hooked up all the pieces simply as I had for the aspect models.

As soon as all the pieces was hung and in place, I used cupboard screws to anchor all the cupboards to the cupboard instantly adjoining. It secured all the pieces collectively and made one massive, strong unit. I used a few dozen cupboard screws in all.
5. Set up cupboard fronts and drawers.
At this level, we may start including cupboard fronts and drawers. The IKEA directions made it simple to put in all of the hinges and cupboard doorways in addition to drawer fronts and slides, and all the pieces match collectively completely.

6. Add crown moulding.
Like I did just a few years in the past with Abby’s workplace workplace bookshelves, I made a decision so as to add crown moulding to the highest of the leisure unit to present it a extra built-in look. We determined to make use of Windsor One Classical Craftsman Crown Molding, which is identical moulding we’re planning so as to add alongside the ceiling line on this complete house.
For the crown molding, I wheeled out the miter noticed and acquired a Kreg Crown Jig to assist with all my crown moulding cuts.
Sooner or later I’m going to chop crown with none kind of jig. When you understand that the noticed mattress is the ceiling and left is true and proper is left, it turns into simple to visualise all the pieces. The important thing to slicing crown with out a jig is to firmly set your piece towards the noticed base and fence on the proper spring angle, after which clamp a help board to your noticed so that every one all different items are seated completely earlier than making any cuts.

As soon as the crown was lower, I used a multi mark instrument to set a constant depth for the bottom of the crown to take a seat all the best way across the cabinets.

I then used my 18 gauge brad nailer to connect the crown to the cabinets.

As soon as the primary piece of crown was hooked up, I added wooden glue to the nook earlier than I nailed within the adjoining piece of crown in order that the corners don’t separate over time.

I continued this course of till I had added crown moulding across the complete high part of the leisure unit.

7. Set up baseboards on the IKEA BESTA leisure unit.
After I completed the crown moulding, it was time to sort out the baseboards. We needed it to look as if the baseboards ran from the wall after which out and across the backside of the built-in cabinets.
A number of issues made this just a little tough…

First, after I elevated the cabinets on the plywood base, I made all the pieces flush with the entrance of the cupboard body. I didn’t take into consideration that the doorways would stick out away from the cupboard body. If I hooked up baseboards on to the bottom that I constructed, they’d look virtually recessed after I put in the doorways. To compensate for this, I used some ripped down 1x5s to construct out the entrance of the bottom to be flush with the cupboard doorways.
Second, it was tough to match our current baseboards. I took measurements and sketched out the profile of our baseboards, however after I went to the house enchancment retailer, I couldn’t discover something that matched the profile completely. I used to be capable of finding one thing shut, although, and I doubt anybody however me will find yourself noticing the slight variations!

Utilizing a coping technique, I used to be in a position to run the brand new cupboard baseboards proper into the prevailing wall baseboards. As a result of the baseboard profiles didn’t match precisely, it wasn’t an ideal match, however I used spackling to fill in any crucial gaps.

The remainder of the baseboard set up was fairly easy with my miter noticed, brad nailer, and plenty of wooden glue for out of doors corners.

After I put in the baseboards, the one factor left for me to do was fill the nail holes with spackling, sand, caulk all gaps, and paint the trim. I additionally added some knobs and cup pulls, after which it was on to Abby’s favourite half– the gorgeous stuff!

Working round a fire reasonably than a TV? This tutorial for IKEA constructed ins round fire makes use of cupboards for a gorgeous transformation!
8. Adorn the open shelving.
I beloved the built-ins even plain, however I believe including the decor items actually gave it a completed look! We used a shade scheme of aqua, white, grey, and metallics to maintain all the pieces wanting cohesive. Then I added some fake greenery all through.


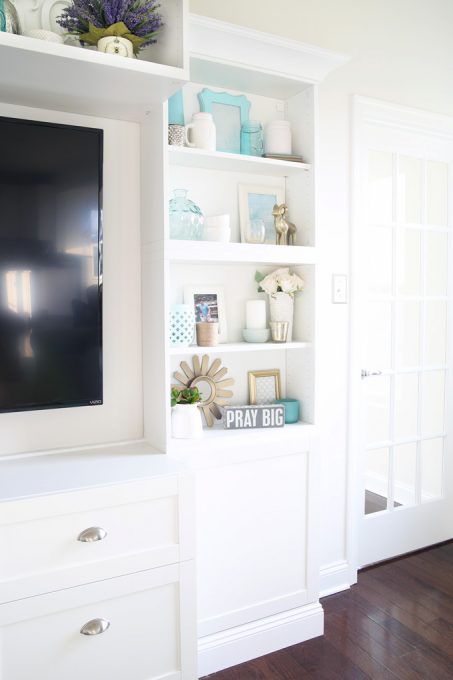
I actually love how the built-ins make the room look extra “completed” and manner much less stark!

Let’s take another have a look at the earlier than and after:

IKEA BESTA Constructed-Ins: Remaining Ideas
This challenge positively took some planning, time, and energy, however the remaining end result was effectively price it!
We ended up spending lower than if we might have bought a big leisure unit, and we had been in a position to create the precise measurement and form we needed. Utilizing the BESTA system for this challenge was additionally manner much less work than if we might have tried to construct all the factor from scratch.
Replace: It has now been greater than 5 years since we constructed our customized IKEA leisure system, and it’s nonetheless holding up superbly! It’s the right centerpiece to our lounge, has tons of storage, and I like to brighten the open shelving for every season. We’d do one other IKEA BESTA challenge in a heartbeat!
Have you ever accomplished any enjoyable DIY initiatives just lately? I’d love to listen to about them within the feedback!
Customized IKEA Leisure System: Regularly Requested Questions
Thanks a lot for following alongside! Hope you’re having an exquisite week!
This put up comprises affiliate hyperlinks. For extra data, see my disclosures right here.
