
We not too long ago created a easy DIY shelf for our boys’ room so as to add some additional storage, and they’re loving it! Comply with this straightforward step-by-step tutorial to create a straightforward, cheap wall-to-wall shelf in your personal house!

I don’t find out about your children, however my children are champions at accumulating issues. Random small statues. Bizarre posters. Little awards. “Essential” items of paper with photos which are exhausting to make out. You already know. Child stuff.
And never solely do they like to gather issues, however additionally they prefer to preserve stated issues of their bed room, as near them as potential whereas they sleep.
Now as somebody who actually likes order and decluttered areas, their little knick knack hoarding behavior was driving me nuts, however it’s their bed room, and I needed them to have the ability to show the issues that had been necessary to them of their area.
However after I walked in at some point and noticed this…

…I knew I needed to do at the very least a mini intervention and discover some kind of setup that might give them freedom to maintain their issues but in addition not make me cringe each time I walked into their room. ?
I had the thought to make a wall-to-wall shelf above their beds so we may assist to clear off their nightstand a bit and create some boundaries for the papers and posters they needed to hold.
Once I ran the thought previous the boys, they had been all for it, so Donnie and I started working determining one of the simplest ways to create a DIY wall shelf.
DIY Shelf: Step-By-Step Tutorial
This put up accommodates affiliate hyperlinks. For extra info, see my disclosures right here.
Step 1- Collect Supplies
These are the supplies we used to finish this undertaking:
Step 2- Notch the Board and Connect the L Brackets
We needed our shelf to have a “floating” look, and the best means we got here up with to do this was to hold it utilizing L brackets.
In order that the brackets would sit flush with our board and never lengthen beneath it, Donnie used a small wooden chisel to create notches within the underside of the board the place the bracket would sit.
As soon as we had created our notches, we may screw the L brackets into place on the underside of the board.

We ended up utilizing two brackets on every finish of the board and 4 brackets spaced out alongside the size of the board, for a complete of eight brackets.

Step 3- Paint or Stain the Board
Since we already had stripes painted on the boys’ wall, we determined to line up the shelf on the underside stripe and needed it to mix in. To get this look, we determined to color our board the identical shade because the stripes, Benjamin Moore Hale Navy. It ended up taking us 3 coats of paint.
We painted our L brackets and screws as effectively in order that they might mix in properly with the shelf and be extra inconspicuous.
You might, after all, paint your board any shade that coordinates along with your room! For those who want a wooden tone, make sure you select a wooden grain board, slightly than the pre-primed choice that we used.
Step 4- Dangle the Shelf
As soon as our paint had dried, we had been prepared to hold the shelf! We used 50 pound zinc drywall anchors to make sure that the shelf can be sturdy and wouldn’t fall down.
The place obtainable, we additionally tapped into the wall studs. However even with out discovering the studs, the kind and variety of drywall anchors we used is greater than sufficient.
We had been certain to measure the space between them in order that the L brackets on the shelf would line up with the drywall anchors precisely.

As soon as the drywall anchors had been in place, I helped to carry the shelf regular whereas Donnie screwed the L brackets into the drywall anchors together with his Ryobi cordless drill.

Step 5- Paint the Screws (Optionally available)
The screws we used to connect the shelf to the wall nonetheless had silver heads, which caught out like a sore thumb since all the things else was blue, so Donnie rapidly touched them up with the Hale Navy paint, and so they blended proper in!

Step 6- Adorn!
As soon as the touch-up paint was dry, it was time for the enjoyable half– adorning the shelf with the boys’ beloved gadgets!
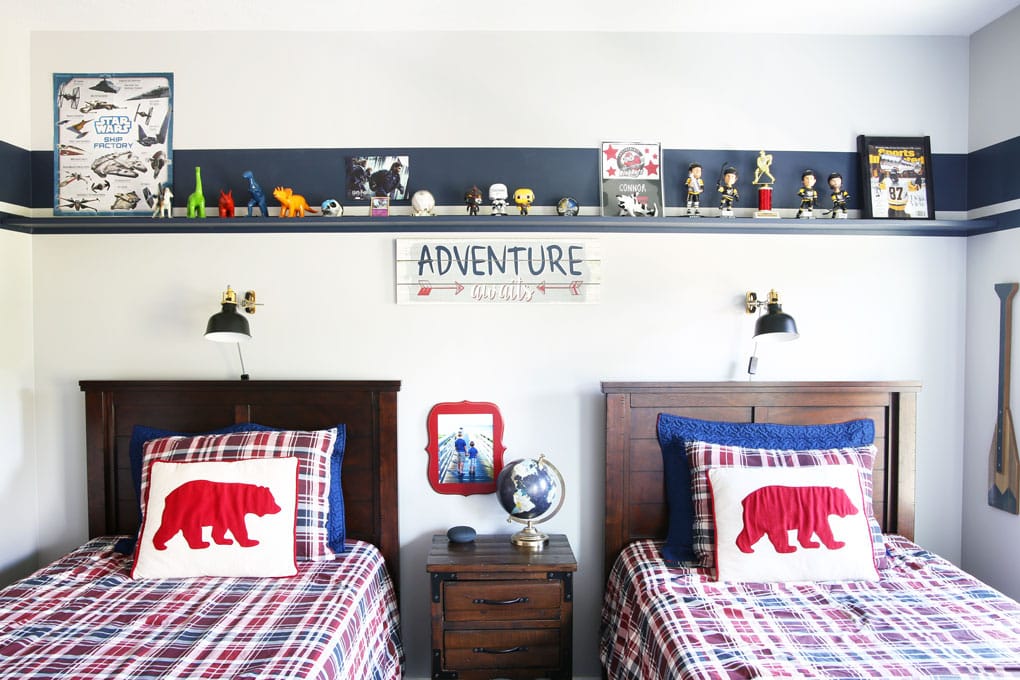
The boys love that they now have a spot to retailer and grasp all of their particular gadgets, and I really like that we’ve created boundaries– all the things must be on or above the shelf– in order that there’s a little bit extra order to the area. It’s a win-win for everybody!
I haven’t determined if I’ll go away the “Journey Awaits” signal or not. (Or possibly transfer it down a little bit?) I feel I’ll dwell with it as is for some time and see how I really feel in a month or two. Issues are at all times altering round right here! ?
Let’s check out the earlier than and after:

A lot tidier!
For those who’re interested by putting in a wall-to-wall DIY shelf in your personal house, make sure you pin the picture beneath so to come again and reference this put up!

And when you’re searching for extra easy DIY tasks to spruce up the partitions of your own home, these posts might help:
Find out how to Paint Excellent Stripes
Board and Batten DIY Tutorial
Find out how to Stencil a Wall
Find out how to Make a Easy Shelf
Set up Craftsman Type Window Trim
Thanks a lot for following alongside! Have a beautiful day!
This put up accommodates affiliate hyperlinks. For extra info, see my disclosures right here.
