
Donnie and I’ve form of developed this routine on the subject of DIY tasks. I come to him excitedly with essentially the most good thought, which nearly all the time entails him constructing one thing. He instantly tells me, “No, we will’t do this. It’s too laborious.” However I do know higher. ? So I very subtly (okay and generally not so subtly) drop little hints to assist him alongside and get him warmed as much as my thought. I ship him stunning photos of comparable tasks on Pinterest. I ship him hyperlinks to different tutorials and say, “See! It’s not that onerous!” Then ultimately I simply begin speaking concerning the undertaking prefer it’s already occurring. And normally he offers in. As a result of he’s an superior husband like that. ?
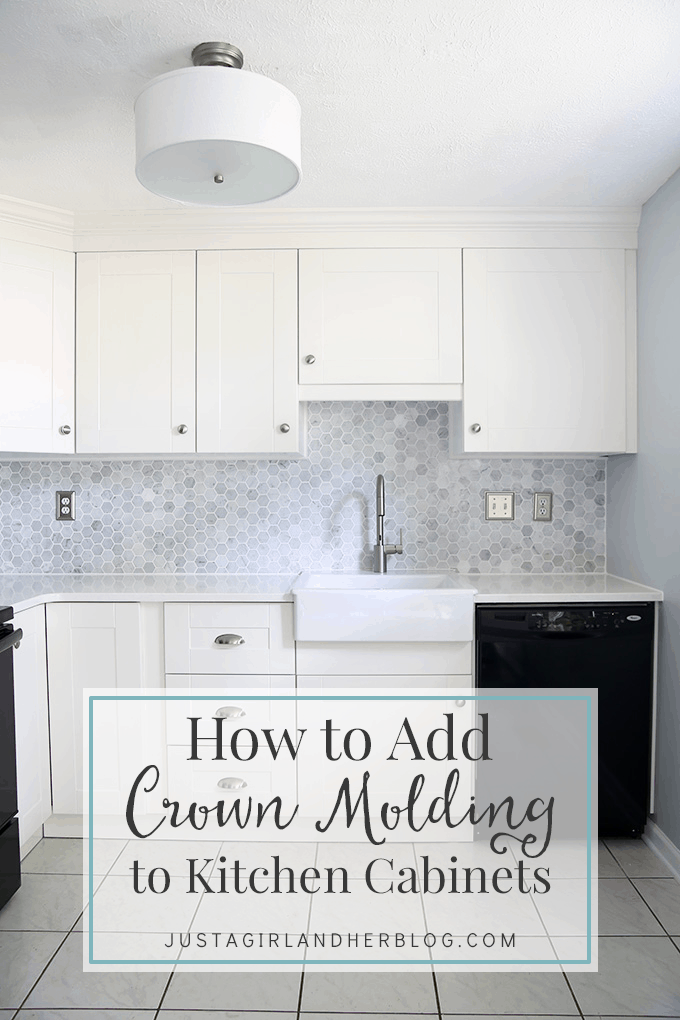
This precise situation performed out after I started speaking about wanting to shut the hole between the highest of our kitchen cupboards and the ceiling. See, in our previous kitchen, we had this house that was massive sufficient to appear to be it ought to maintain one thing however not massive sufficient to really maintain one thing, and it actually bugged me.

I attempted placing stuff up there infrequently, however nothing ever seemed proper, so it largely sat empty, staring again at me and taunting me with its vacancy. {Additionally generally I’m a bit dramatic… ? } However after we determined to place in a model new stunning kitchen, I noticed my alternative to say bye bye to the bizarre, awkward hole! I virtually didn’t suppose it was going to occur. At one level Donnie was fairly satisfied that it might by no means work. However because the aforementioned routine normally goes, he ended up going for it and {spoiler alert!} even admitted that it was approach simpler than he thought it might be! Yay! Since he’s the one who did the grunt work for this undertaking, I’ll let him stroll you thru it…
This put up comprises affiliate hyperlinks. For extra info, see my disclosures right here.
Our kitchen ceiling top put us in a tough place after putting in our IKEA kitchen cupboards. If our ceiling was a bit larger we may have used taller wall cupboards. If our ceiling was decrease we wouldn’t have had a 5 1/2” hole between the highest of our cupboards and the kitchen ceiling.
All through the whole kitchen renovation Abby saved hinting that she needed me to fill within the hole. I saved attempting to inform her that filling in that enormous of a niche was a lot more durable than it seemed and was not a easy undertaking. Ultimately I gave in… that’s the way it normally occurs. She’s fairly convincing!
Because it seems, this undertaking wasn’t practically as laborious as I assumed it might be. For a non-expert like me it was a couple of 6 hour job in our small kitchen.
Instruments and Supplies:
Due to our considerably wavy ceiling, our hole different between 5 1/4” and 5 1/2”. I used a desk noticed to tear down a number of 1x6s to a 5 1/8” width.
I made a decision to anchor every thing into the cupboards themselves as a substitute of counting on ground joists within the ceiling. The prospect of a parallel working joist matching up with our trim was unlikely.

I minimize straight 1x3s and positioned them each few ft on high of the cupboards. I pre-drilled via the cupboards after which used 3 1/2″ cupboard screws to connect the braces. The cupboard screws had been nice. I selected a Torx (star) head as a result of I are likely to strip Phillips head screws when making use of strain over my head. The size actually made a agency base to begin the trim set up. I used to be happy with how strong every thing felt.

I put in the 1x3s to take a seat flush with the entrance of the cupboard body. That approach when the remainder of the trim work was hooked up, it might sit flush with the entrance of the cupboard doorways and provides a extra completed and customized look.
Subsequent I put in the ripped down MDF 1×6’s with my 18ga Ryobi Airstrike Brad Nailer (no compressor or air hose wanted!). I used 1 3/4” brads. The corners had been mitered and glued above our two-angle nook cupboard. Fortuitously my chop noticed is pre-notched for 22.5 levels in addition to 45 levels.
Be sure to make use of wooden glue on the corners or wherever two items come collectively. In the event you skip this half, the joints will have a tendency to tug aside over time.
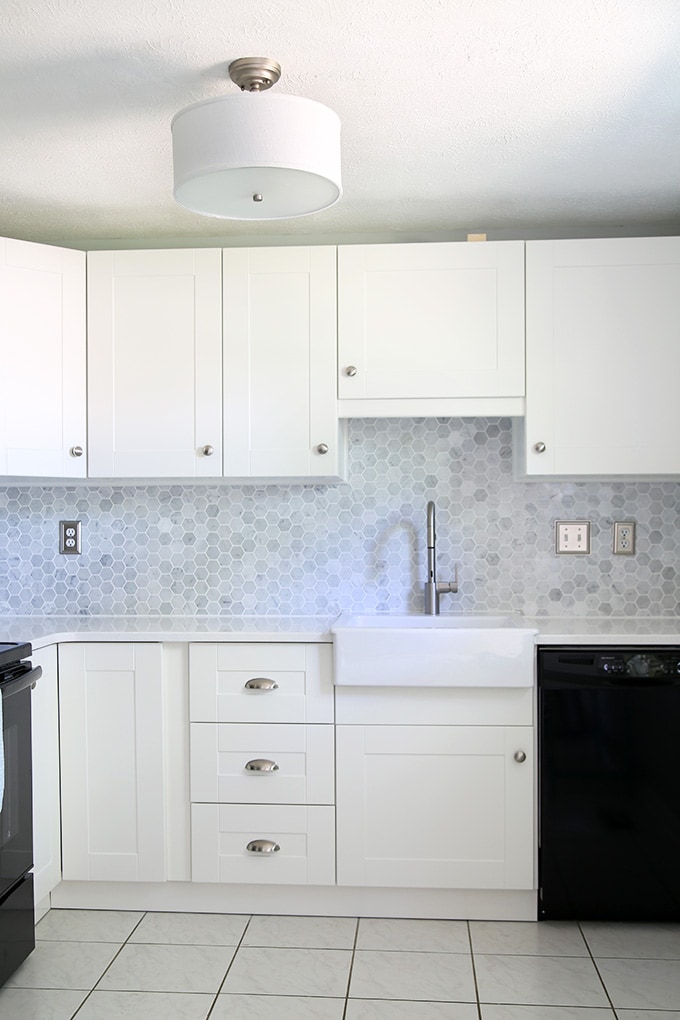
I now had a pleasant flat header above my cupboards with a tiny hole on the high. It was trying higher already!

In the event you’ve ever accomplished any end woodwork, you perceive the complexity of crown molding. Baseboards are easy — maintain the board in opposition to the noticed fence and alter the angle accordingly. No large deal. With crown molding it looks as if there are 10 concerns to make for each single minimize. Not solely do you have got to pay attention to an inside nook, exterior nook, proper board, or left board, you additionally should magically maintain the crown molding up in opposition to your miter noticed fence at simply the suitable angle or else your corners won’t ever match collectively.
I expressed my angst to my dad, and like he normally does, he had the right device for my downside. He let me borrow this little crown molding jig that turned a difficult job right into a breeze.

You make a number of changes on the jig to match your particular crown molding after which you’re set. The jig itself has a pleasant visible information to assist when reducing. You simply have to have a look at the image and place the jig in your noticed accordingly. Is it an inside nook or exterior nook? Is the minimize on the left aspect of the trim piece or the suitable aspect? Simply comply with the image for excellent crown molding cuts. I’ll definitely be buying certainly one of these for my subsequent crown molding undertaking!
I selected MDF as a substitute of actual wooden for our crown molding. My private opinion is that low cost wooden is inferior to low cost MDF — and with as a lot as we’ve invested within the kitchen already, I definitely needed make this undertaking as cheap as doable! Low cost wooden tends to separate, crack, and warp when in comparison with MDF. The pre-primed MDF crown molding I bought was underneath $1/foot, and all the boards had been completely true and free from any floor blemishes.
I hooked up the crown molding to the ripped down 1×6” with 3/4” brads. As a result of the one attachment level was the underside of the crown molding (nothing into the ceiling) I made certain to make use of a nail each two or three inches. As standard, there was not one cut up or crack with the MDF. Once more, be certain to connect and nail the mitered corners and joints.

As a result of I’m a catastrophe with caulking gun, I used the small squeeze tubes of caulking for this detailed sort of labor. There’s no want for tremendous sturdy and waterproof silicone caulking this excessive up on the ceiling. It’s more durable to make use of and more durable to scrub. I used DAP 20 minute dry white acrylic caulking. Abby patched the nail holes and we had been prepared to color!
We had been a bit nervous about discovering the right paint coloration since our cupboards are off-white, however we examined a number of paint samples and eventually decided that Behr Dwelling Decorator’s Assortment Swiss Cream is the right match to our IKEA GRIMSLOV off-white cupboard doorways. As a result of sturdiness is much less of a difficulty up excessive in contrast with baseboards, we selected a satin end. The much less gentle that displays off the floor, the higher the trim will look. Each imperfection is noticeable on high-gloss surfaces.
It solely took two fast coats of paint on our pre-primed MDF to get a pleasant end. I feel the colour match is almost excellent!

Trying again, Abby was proper– the trim work to fill within the hole above our cupboards made a giant distinction. It feels way more “completed” now, and I’m actually glad we determined to go forward with this undertaking!

Such a distinction, proper?! {Plus it’s all the time form of enjoyable for me when Donnie admits that I used to be proper a couple of undertaking… ? }
As you’ll be able to see, we’re *so* near having the ability to name this house “accomplished!” Yippee!!
Replace: The kitchen is completed! See our DIY white kitchen reveal right here and my sincere IKEA kitchen evaluation right here!
Thanks for following together with our kitchen reno! Have a beautiful week!
This put up comprises affiliate hyperlinks. For extra info, see my disclosures right here.
