
Discover ways to set up a vertical shiplap wall and create a fantastic accent wall to your room!

Our laundry room is fairly small. However whereas we had been making some modifications, I wished to offer it a little bit of a “wow” issue with a fairly characteristic wall.
Contemplating we began with fairly boring white partitions…

…we had our work minimize out for us! ?
I can’t consider it took us this lengthy to do one thing with shiplap! However this small area appeared like the proper place to offer it a attempt. Slightly than do the standard white shiplap working horizontally, we determined to modify it up and do a vertical shiplap wall in my favourite shade of aqua!
Right here’s how we created our vertical shiplap wall…
Aqua Vertical Shiplap Wall
This put up accommodates affiliate hyperlinks. For extra data, see my disclosures right here.
Step 1- Collect obligatory provides.
Step 2- Paint the sides of the shiplap.
There are methods to create fake shiplap at a really low value. However since we had been doing such a small wall, we determined to buy pre-primed shiplap to avoid wasting ourselves from having to tear down bigger boards.

Once I was researching completely different shiplap-ing methods, I learn on my good friend Amanda’s weblog, Love and Renovations, that she regretted not portray her boards forward of time. She mentioned that it was troublesome to get down into the crevices in between the boards to color after they had been put in.
Donnie was fearful that if we painted your entire board, we might find yourself messing up plenty of the paint as we put in it. So we determined to take a center floor.
We painted simply the sides of the boards so we wouldn’t need to get down into the crevices afterward. This additionally left the center of the boards clear so we wouldn’t have to fret about messing up the paint throughout set up. Win-win!

Just a bit heads up… The shiplap boards we bought had a unique measurement grooved lip on both aspect of the board. If we put in them on the aspect with the bigger lip (within the left picture beneath), we might find yourself with a small hole in between our boards, which is what we wished. If we put in them on the aspect with the smaller lip (in the suitable picture beneath), the boards would sit proper up in opposition to one another.

I point out this as a result of it affected which aspect of the board we wanted to color as we had been portray the sides of the shiplap. Additionally it is one thing you’ll need to take note of throughout set up in order that your boards are evenly spaced.
Step 3- Measure and minimize the shiplap boards.
As soon as the sides of our boards had been painted, it was time to chop them to measurement for set up. Donnie used the miter noticed to do that.
We had just a few obstacles on our wall that we needed to work round with our shiplap boards, like our washer water provide.

To verify our boards match round them correctly, we traced across the cowl plate with a pencil to mark the world we might need to maintain clear. Then we may reinstall the plate after the shiplap was in.
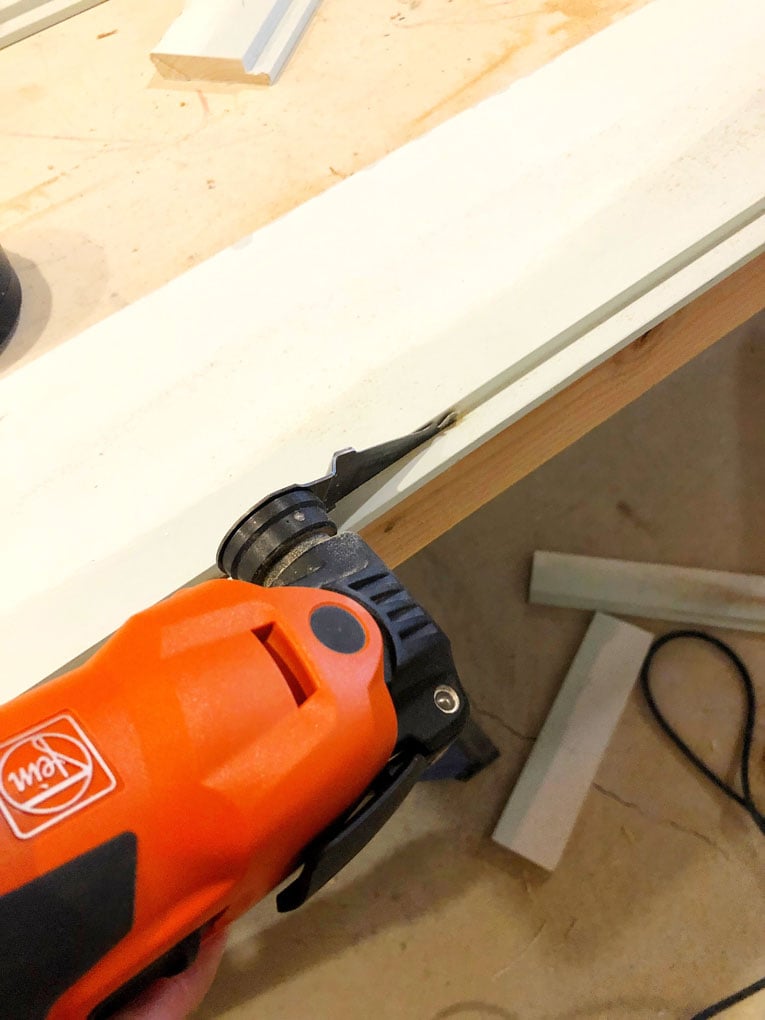
For these non-standard cuts round retailers and our washer water provide, Donnie used his Fein Oscillating Multi-Instrument.

What’s good about about an oscilating multi-tool is that it will possibly make plunge cuts proper in the course of the shiplap if wanted. That is one thing {that a} miter noticed can not do.

Step 4- Set up the vertical shiplap.
As soon as all of our boards had been minimize to the right specs, it was time to put in them! There are a lot of alternative ways to stick shiplap to the wall.
We opted to make use of Liquid Nails on the backs of the boards to stick them. Observe that Liquid Nails will more than likely wreck your drywall should you attempt to take away the boards. So if you’re putting in vertical shiplap as a considerably non permanent wall therapy, you could not need to use Liquid Nails. We don’t plan to take away our shiplap anytime quickly, so we had been positive with this methodology.
Alternate Shiplap Set up Choices
If we used horizontal shiplap, each bit would have a number of contacts with wall studs, and we might’ve chosen a unique methodology that didn’t contain the Liquid Nails adhesive. As a result of we went with a vertical set up, we didn’t have the choice of attaching most items to a stud.
An alternative choice for vertical shiplap set up can be using furring strips hooked up to the wall (anchored to the studs). Then the shiplap would connect to the furring strips. This methodology would work nicely in some conditions. However as a result of our wall had the washer provide traces and the 220 volt outlet for the dryer, the furring strips would’ve added an excessive amount of depth. This could’ve required us to do vital work to alter the depth of the plumbing and electrical retailers.
Utilizing Liquid Nails to Adhere Vertical Shiplap Boards

After a bit of shiplap was minimize to the right measurement, we utilized a liberal quantity of Liquid Nails to the again of the shiplap. We then pressed it up in opposition to the wall.
To verify we achieved a cosy match, we used a block of wooden and rubber mallet to faucet every part of shiplap into place.

To solidify our vertical shiplap items and ensure they weren’t going anyplace, we adopted up with our nail gun. We used an 18 gauge Ryobi brad nailer. The first energy of the shiplap will come from the Liquid Nails, however the brad nailer ensures that the shiplap doesn’t transfer round because the Liquid Nails is drying.

After we received fortunate, a chunk of vertical shiplap would align with a stud. We made certain to anchor that individual piece to the stud.
Measure every part of wall earlier than reducing the boards.
Normally, the space between the ground or baseboard and the ceiling isn’t completely uniform throughout the wall. In our case, that hole barely widened as we labored our approach down the wall. We don’t suggest reducing the entire shiplap without delay with out measuring every particular part of the wall. It’s possible you’ll find yourself with a tougher job of filling giant gaps on the finish of the challenge.
As we labored our approach left to proper down the wall, we had been nearly capable of finish the challenge with a full piece. Sadly, there was a spot that required only a sliver of fabric to look appropriate. We used the oscillating multi-tool to tear down down an additional piece of shiplap and take away the notch part. We then used this piece on its finish to fill the hole on the suitable aspect of the wall. This allowed us to maintain the right spacing and find yourself with a fair, completed look.
After every of our items of shiplap had been glued and nailed to the wall, we had been prepared to maneuver on to patching and caulking!

Step 5- Patch and caulk the vertical shiplap.
Utilizing our nail gun to stick the shiplap to the wall left our boards with a number of holes that wanted to be crammed.

We used wooden filler and a painter’s software to fill the holes and scrape away any extra. As soon as all of the holes had been crammed, we went over your entire floor with an orbital sander to verify every little thing was good and easy. We wished to be sure that it wouldn’t be apparent the place the nail holes had been after we painted.

Sanding the boards left some mud behind, so we wiped down the entire boards as completely as doable with a humid fabric to do away with the mud layer.

After the patching was full, we additionally used caulk to create a easy transition between the sting of the board and the partitions. We caulked on the prime of the boards subsequent to the ceiling and the place the boards met the baseboard as nicely.

To caulk these edges, we merely ran a bead of caulk down the sting the place the board met the wall. Then we used a finger to easy it into the hole.
Step 6- Paint the vertical shiplap.
As soon as the vertical shiplap was all patched and caulked, it was time to color the boards! We wished a extremely easy paint line between the aqua shiplap and the white wall and ceiling. So we taped off across the edges of the shiplap.

(The area between the underside of the shiplap and the overhang of the baseboard was very small. It might have been exhausting to tape it off successfully. So we simply minimize in with a paint brush REALLY fastidiously on the backside of the boards!)
We used a paint brush to do the element work on our wall. This included the area across the edges of retailers and on the tops and bottoms of the boards. Then we used a small foam curler to color the remainder of the vertical shiplap wall.

After the paint dried, we used a small brush to do any little touchups that had been obligatory. Then our vertical shiplap characteristic wall was completed!

I’m loving the pop of aqua on this area!

Our first time working with shiplap went actually easily. It gave us simply the look we had been going for! I could or is probably not wanting round for different methods to include it into our residence! ?
Pondering of including a vertical shiplap wall in your house? You should definitely pin the picture beneath so you may refer again to this put up later!

Have you ever put in a shiplap wall in your home? I’d love to listen to about your expertise within the feedback beneath!
Thanks a lot for following alongside! Have an exquisite day!
This put up accommodates affiliate hyperlinks. For extra data, see my disclosures right here.
