
Discover ways to construct a DIY tilt-out trash cupboard on a finances so you’ll be able to conceal these ugly rubbish cans as soon as and for all!

I’m a professional at developing with challenge concepts… principally concepts that I would like Donnie to assist me execute. (He loves it, I promise! ? ) Whereas we have been engaged on the kitchen, I had loads of stated concepts, together with one to construct a customized cupboard to cover our trash can (as a result of actually, who needs to take a look at a trash can?!).
As I often do, I stored sending Donnie pictures and hyperlinks to plans for such a cupboard till he agreed to construct it. ? As a result of he’s superior, he whipped up one of the best customized cupboard ever, AND it even matches the remainder of our kitchen completely– woot!
Since Donnie is the one which put all of it collectively, I’m going to let him share the how-to. Right here he’s….
Constructing a DIY Tilt-Out Trash Cupboard
An enormous due to Elmer’s for sponsoring this put up! Our favorable opinion of top of the range merchandise that assist us construct superior issues is 100% our personal. ? This put up accommodates affiliate hyperlinks. For extra data, see my disclosures right here.
Once we started our kitchen rework, we knew we have been going to must do one thing concerning the trash can– our outdated one was stained and dented and simply needed to go.
Whereas we might have cherished to have had room to work the trash can into the cupboards that have been already a part of the kitchen plan, house prohibited us from doing so, so we got down to construct a customized cupboard of our personal.
Like Abby at all times does, she discovered the right plan for a customized constructed tilt-out trash can cupboard on Ana White’s unbelievable DIY weblog. (Whilst you’re on her website, try her progress on her Alaskan cabin!)
I rapidly appeared over the plan and agreed to provide it a shot. I’m no cupboard builder, however I do know find out how to measure and reduce wooden. Paint and wood-filler can conceal a whole lot of errors!
We determined to change the plan and provides it a extra customized look by utilizing a cupboard door that matched the remainder of our kitchen somewhat than constructing a generic door that was a unique type.
For any such customized challenge, I like to recommend buying your best measurement/type trash can first after which constructing a tilt-out cupboard round that measurement. Our native Goal had a dozen or so trash can measurement choices, and the big rectangular trash cans appeared to work finest.
The way to Make a DIY Trash Can Cupboard Step-by-Step
Instruments and Provides You’ll Want
1. Select the cupboard door sized in your rubbish can + lumber.
Step one was deciding what measurement cupboard door would work finest for this challenge. We ended up with a 21” x 30” door, and that ended up being excellent for a massive measurement rubbish can. Relying on the dimensions of your house, you could choose a smaller or bigger completed challenge.
On the residence enchancment retailer, I didn’t notice I’d have so many 1×12 choices. I knew that my challenge can be painted, so I used to be extra involved with discovering straight boards that have been knot-free. I ended up with some very nice pine boards– not the only option for high-end furnishings, however the excellent worth level for this rubbish can challenge.
2. Measure the lumber for the tilt-out trash cupboard.
When getting ready to chop the 4 sides of the cupboard body out of 1x12s, I used the cupboard door measurements and added an 1/8” to every facet. This ensured that I had loads of room for the slender hinges and freedom of motion to open and shut the tilt-out cupboard.
I can’t overemphasize how vital it’s to get your preliminary dimensions and cuts simply excellent. There was no solution to alter the dimensions of the cupboard door, so I had to ensure the cupboard body would create an ideal match. I used a pencil and paper to sketch every part out. Measure twice, reduce as soon as! I additionally made positive I left sufficient room on the backside of the cupboard for the 1×3 toe kick.
As soon as I had the 4-sided body of 1x12s measured and reduce, I double checked my dimensions yet one more time. I even went so far as to carry every part up in opposition to my cupboard door to ensure my math wasn’t off. After this triple verification, I began making my pocket holes to attach the body collectively.
3. Drill the pocket holes.

This was my first time utilizing a Kreg Jig equipment, and man was it enjoyable! I purchased the least costly mannequin, and it was excellent for my wants. The included instructions make getting an ideal pocket gap a breeze.

4. Glue the joints collectively.
After I drilled the pocket holes (I did three per facet), I used a beneficiant quantity of Elmer’s Carpenter’s Wooden Glue on the joints earlier than screwing every part collectively.
If you already know something about cabinetry and even trim work, you already know that wooden screws can pull unfastened over time and create an unsightly, flimsy hole in your challenge. The one solution to make that excellent joint that by no means separates is with screws and wooden glue.
If I’m portray a challenge I at all times use the common Elmer’s Wooden Glue, but when it’s a staining challenge I at all times be sure that to make use of their Wooden Glue Max product. It has some actual wooden fibers within the glue.
I’ve discovered that even after wiping away the surplus that wooden fibers settle for some stain. You find yourself with nicer completed challenge with out bizarre mild spots that inferior model wooden glue can go away.

I used to be actually impressed with how straightforward it was to create extremely robust joints with the Kreg Jig and Elmer’s Wooden Glue. Simply having the 4 1x12s collectively with out another structural help, the cupboard felt rock-solid. I’m now an enormous pocket gap fan.
With the trash can cupboard, I believed it made essentially the most sense to go away the again open for cleansing and straightforward removing of the trash can if want be. In case your circumstances are totally different and also you need a again, a bit of finish-grade plywood ought to do the trick. To me, it was pointless weight and expense.
5. Assemble the end boards for the tilt-out trash cupboard.
After the 4 cupboard sides have been joined, it was time to connect the assorted 1x3s and 1x2s trim items to provide the cupboard a completed look.
I adopted the very same course of as earlier than — measure twice, reduce as soon as, connect with the pocket gap technique and Elmer’s Wooden Glue. At this stage I discovered that bar clamps have been useful in holding the small trim items in place whereas I mounted the joints.
Right here’s the place I used my 1x3s:
- Backside toe-kick
- Rear base trim
- Beneath the highest entrance ledge
Right here’s the place I used my 1x2s:
- Cupboard high overhanging “lip”
- Back and front sides
- Prime again piece
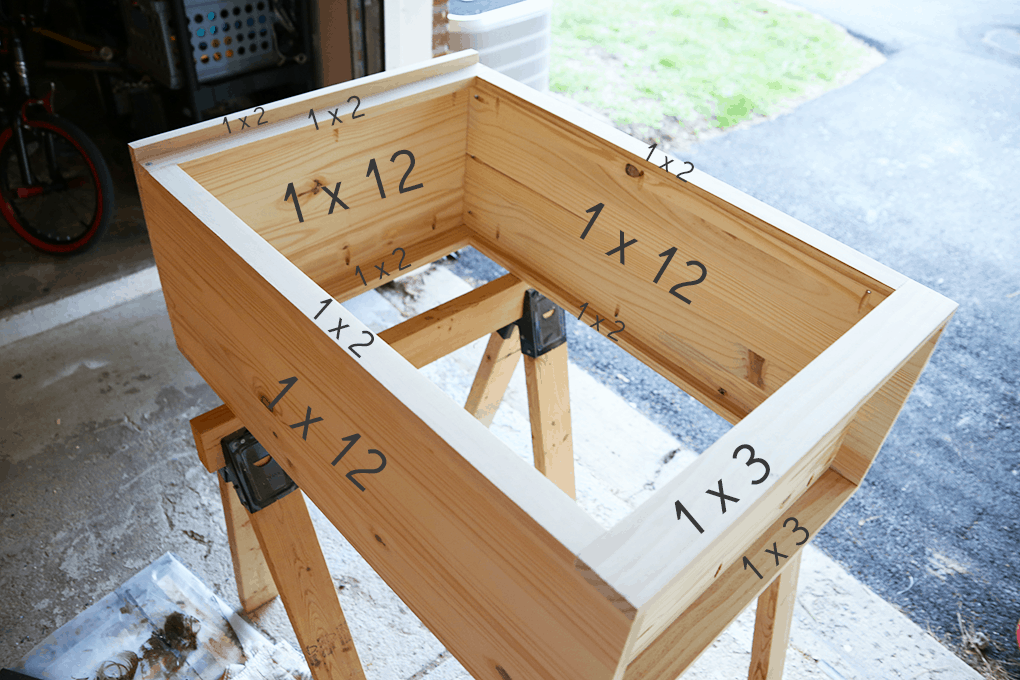
Which will sound complicated nevertheless it actually wasn’t. Check out our image in addition to the Ana White plan, and it’s fairly apparent the place each bit goes.
6. Apply wooden filler if wanted.
One other profit to utilizing pocket holes is that you simply don’t have a bunch of nail or screw holes on the entrance floor of your challenge. I did have a niche or two the place my trim items got here collectively (I’m not a professional) and for these I rapidly crammed them with Elmer’s Wooden Filler.
7. Sand the cupboard.
As soon as the trim items have been hooked up and glued, I made positive to sand down the cupboard with my orbital sander. This cheap instrument actually is useful for these woodworking-type initiatives.
8. Prime and paint.
I truly get pleasure from listening to podcasts with my headphones whereas I let the ability sander do all of the work. I labored my approach down progressively, beginning with a a course sand paper and shifting to a really effective sandpaper. This gave me a pleasant clean floor for primer and paint.
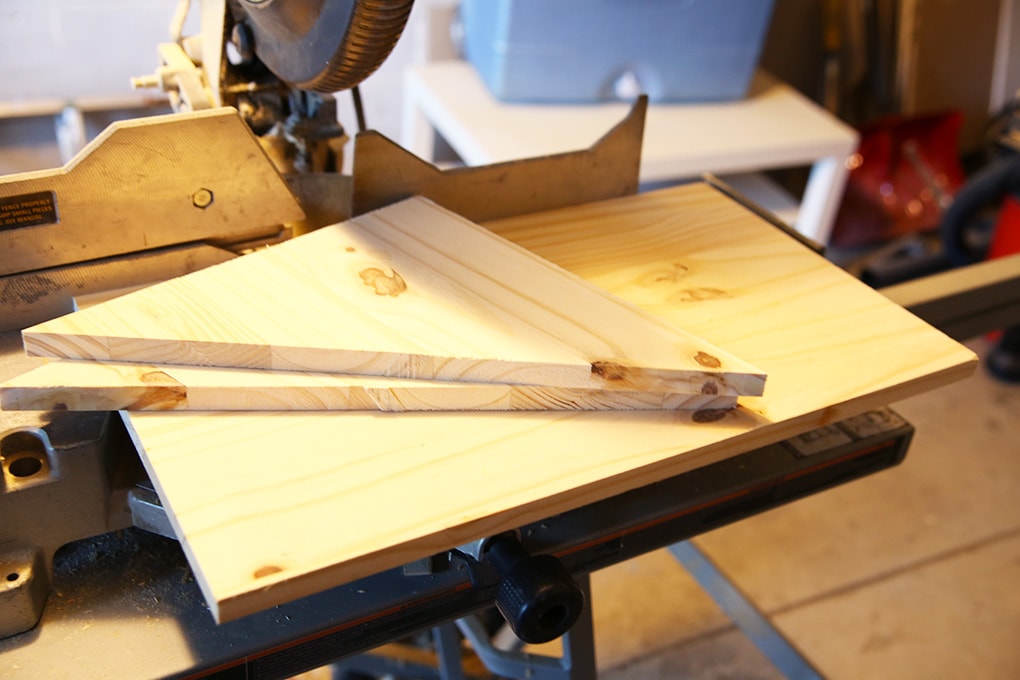
9. Reduce and assemble the lean door.
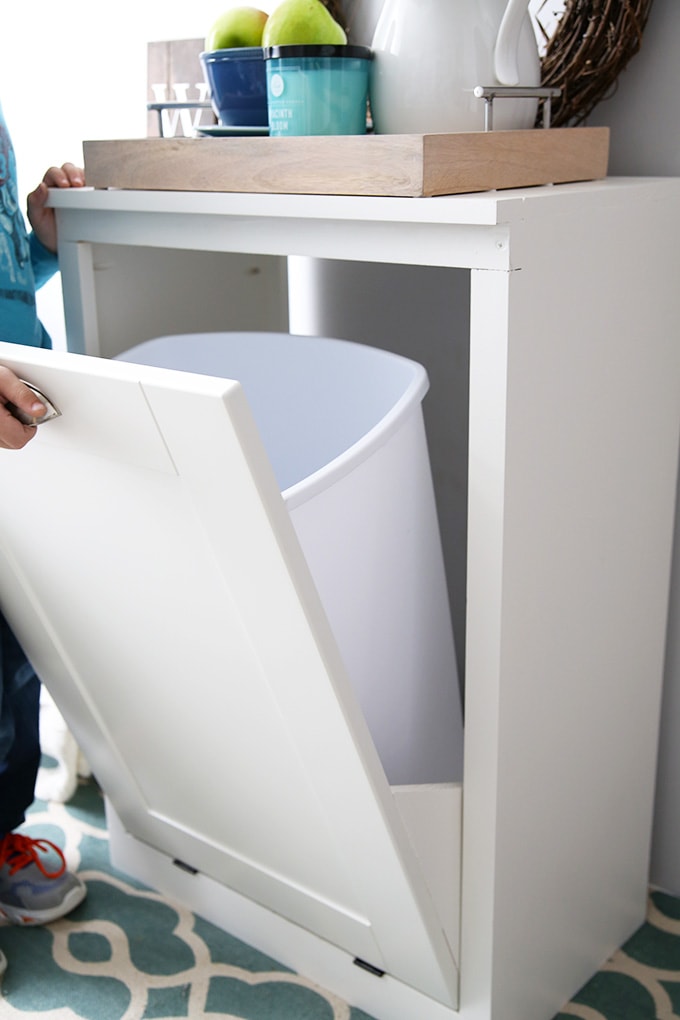
As soon as the cupboard “field” was painted, it was time to work on the tilt-out cupboard door. You possibly can see within the image that that I reduce two 1x12s at a forty five diploma angle with my chop noticed (a desk noticed or round noticed would work as properly) for the angled sides. I then made a straight reduce on a 1×12 for the rubbish can resting spot.
I now had two separate items of the challenge — the cupboard body and the tilt-out cupboard door. Place the door into the cupboard body to ensure every part matches. (I held my breath for this.)
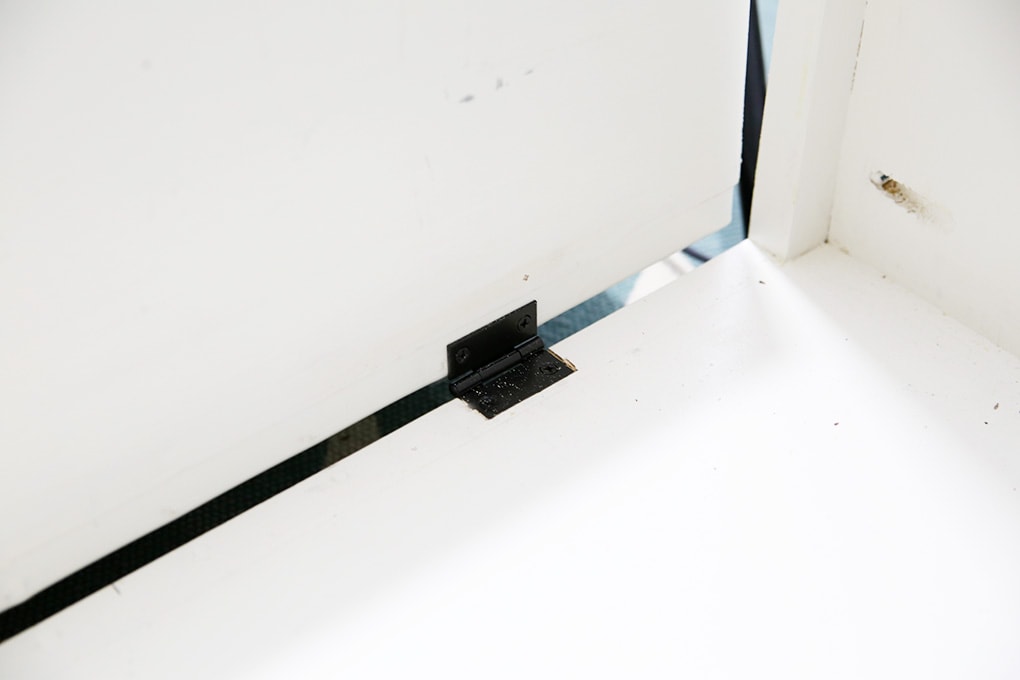
10. Screw on the hinges.
When choosing hinges for the challenge, I thought-about a 12” lengthy piano type hinge, however I ended up shopping for two slender hinges that have been smaller however appeared barely thicker and extra sturdy than the flexible piano hinges. I believe that both would work simply effective.
First I positioned the hinges on the cupboard body and traced them with a pencil. Then I used a wooden chisel to create barely recessed seat for the hinges. I might have skipped this step, however the recessed hinges allowed for a greater match. It could’ve been a bit too tight with out the recess for the hinges.
I made a decision to not create the identical indent or recessed spot on the cupboard door due to the a lot more durable materials of the cupboard entrance. After creating the indent on the cupboard body, attaching the hinges with the supplied wooden screws was straightforward.
11. Add the drawer pull for the tilt-out trash cupboard.
We used a drawer pull that matched the remainder of our kitchen for the deal with, and the challenge was full!

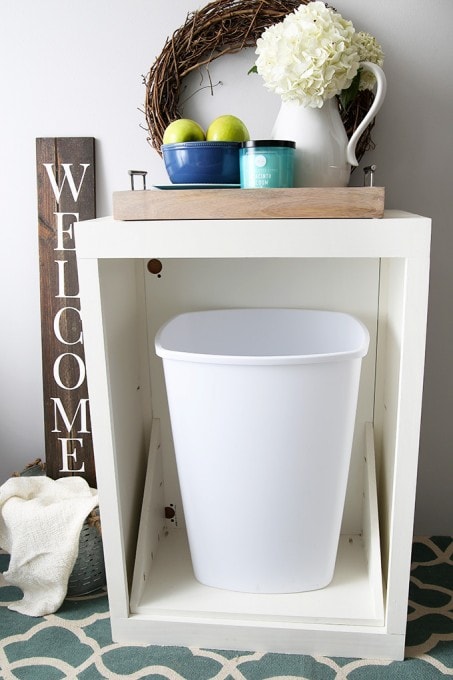
This actually is the kind of challenge that anybody can do. For woodworking, the joinery side is at all times essentially the most troublesome for me, however I’ve a lot extra confidence now that I’ve found the power of pocket gap + Elmer’s Wooden Glue mixture.
So superior, proper?! He tries to tug the, “I don’t know if I’m expert sufficient to construct this…” line, however I do know higher– his initiatives at all times end up superbly!
Prep Time
half-hour
Lively Time
4 hours
Whole Time
4 hours half-hour
Issue
Medium
Estimated Price
$200
Directions
- Measure and reduce the 1x12s to construct the body of the cupboard. I used the cupboard door measurements and added an 1/8” to every facet to ensure I had loads of room for the slender hinges.
- Use the Kreg Jig to make the pocket holes. I drilled 3 per facet.
- Add wooden glue to the entire joints then screw them collectively.
- Measure, reduce, and fix the 1x2s and 1x3s for a completed look.
- If there are any gaps, apply wooden filler.
- Sand down your complete cupboard beginning with a rough paper, working all the way down to a finer paper.
- Prime the cupboard field, then paint.
- Cut two 1x12s at a forty five diploma angle for the angled sides of the lean door.
- Make a straight reduce on a 1×12 for the can resting spot.
- Sand, prime, and paint the door items.
- Install the hinges. I positioned the hinges on the cupboard body and traced them with a pencil earlier than utilizing a wooden chisel to create barely recessed seat for the hinges.
- Add the drawer pull.
Really helpful Merchandise
As an Amazon Affiliate and member of different affiliate packages, I earn from qualifying purchases.
Have you ever completed any DIY constructing initiatives currently? I’d love to listen to about them within the feedback!
[Psssttt… Get our top 100 tips for organizing every room of the house here!]
Have an exquisite day, associates!
An enormous due to Elmer’s for sponsoring this put up! Our favorable opinion of top of the range merchandise that assist us construct superior issues is 100% our personal. ? This put up accommodates affiliate hyperlinks. For extra data, see my disclosures right here.
